Tuesday, May 19, 2015

10 Exotic & Bizarre Breeds Of Chickens

Chickens can be really amusing creatures to have running around a garden or yard. They are always busy doing something or other, chasing flies or scratching at the dirt. But they are creatures of habit and have their set routines, when to chase about, when to have a sand bath, when to sprawl out in the sunshine and when to just sit on a perch and kick back watching the world go by.

Most people have seen photos of the chickens that supply us with our eggs, but have you ever heard of or seen a Faverolle or maybe a Booted Bantam? Below are 10 exotic and sometimes bizarre looking breeds you may never have seen or  even heard of:


These adorable looking chickens have gorgeous puffy beards and tufts on the sides of their faces, reminiscent of Father Christmas. In fact, the festive song, the 12 days of Christmas makes a reference to three French hens which just happen to be the delightful Faverolles.

The chickens are native to France, and they are extremely cute looking with their beards, muffs and feathered feet that boast five toes on each foot, much like another breed called the Silkie. Today, the Faverolle is often favoured by people who love to exhibit their birds and you can spot them at many a poultry or large agricultural show.


Silkies are lovely if a little strange looking creatures. They are well known for their extremely docile temperament. It's thought these chickens originally came from China or other Asian countries and it's a pretty unique breed. It draws its name from its very distinctive plumage which feels just like silk. Silkies also boast strange dark blue coloured skin and earlobes – their bones are the same colour too! Like the Faverolle, Silkies boast five toes on their feet!


This amazing breed of chicken is literally covered from head to toe in feathers – with extremely long ones on their feet! The breed originates from Turkey and have always been considered as an ornamental bird. In days long ago, these great looking chickens were kept by Ottoman sultans in their gardens. Today, the breed is kept very much for the same reason, which is as ornamental show birds.


These curly feathered chickens are really amazing to look at. Their feathers curl away from their bodies. Some chicken fanciers consider this a totally unique breed although some other breeds of chickens can boast curly feathers too but none so striking and unique as the Frizzle!


When you first see this breed of chicken, there doesn't seem to be anything very unusual about them. Then you look a little closer and you suddenly notice their feet! These are covered in long feathers, hence the name Booted. The feathers on their feet are extravagant to say the least, but they are also on the bird's hocks too! They are lovely looking chickens with a gorgeous coloured plumage.


In France there are many lovely breeds of chickens and none so elegant than the “La Fleche”. The breed is very rare today with numbers slowly on the increase due to the dedication of several poultry fanciers both in France and elsewhere in the world. The main characteristic of the chicken is its rather unusual shaped comb which is in the very distinct shape of a V.


This breed is truly extraordinary to look at with its massive feathered crest, it virtually covers the whole of the bird's head! The breed is primarily bred as a show bird but originally, these funny looking creatures were bred and kept as egg laying chickens.


Native to Switzerland, the home of the cuckoo clock and delicious chocolate, the Appenzeller is a remarkable looking chicken. There are two types to the breed,  namely the Spitzhauben and the Barthuhner with the first having a very distinctive V-comb while the latter is bearded and boasts a rose comb but does not have a crest. The breed has an amazing spotted plumage and is a very elegant looking bird.


This is another rare breed that originates in the Normandy town of Crevecoeur in France. The breed boasts being one of the oldest French chickens and might even be the ancestor of the La Fleche although this has not been confirmed. The birds have elegant and fine black plumage with a V-shaped comb.  They also have amusing looking large feathered crests too. One weird characteristic, is their dark blue/grey coloured legs that look very similar to plastic!


The Arancana are also known as the South American Rumpless chicken. They are gorgeous dainty birds that have funny little beards. They originate from Chile and boast some rather unusual characteristics which includes the fact they lay blue eggs. They also have feathered tufts around their ears and don't have rumps like other chickens – hence their name “the Rumpless chicken”.

Friday, April 24, 2015

Avocado Varieties


Bacon avocado

Bacon


Pear-shaped ovate fruit, green even when ripe.  The skin is green, thin, bright, and sensitive to damage caused by wind. Medium size to large (170-510 grams). Large seed with 61% flesh available. The taste is mediocre. It is a good pollinator for Hass. Large and upright trees used as windbreaks.

Fuerte avocado

Fuerte


Pear shaped fruit with a characteristic neck, though it can vary from elongated with a long narrow neck to round with a wide and short neck. Its skin is thin, green, moderately bright, flexible texture with a somewhat grainy surface. Medium size to large (170-500 grams). Medium to large seed with 75-77% flesh available. Excellent quality flesh, tasty and nutty flavor.

Hass Aguacate

Hass


Pear-shaped dark green fruit on the tree that turns purple to black when ripe. The skin has a medium to coarse, rough texture. Small to medium size (140-400 grams). The seed is medium size with 66-70% flesh. Excellent quality flesh with a rich, nutty flavor.

Aguacate lamb-hass

Lamb Hass


Variety recently introduced in Spain. The fruit is very similar to Hass but with wider shoulders and black skin at maturity. Larger fruit and matures later than Hass (June-July). It is more productive, more tolerant to winds, to high temperatures and persea mite than Hass.

Aguacate pinkerton

Pinkerton


Pear fruit with a very long neck in temperate climates. The skin is medium thick, similar to Hass, dark green, with protruding granules and easy to peel. Medium size (230-425 grams).  Relatively small seed and 82% flesh. Its flesh has a good quality with a nutty taste.

Aguacate reed

Reed


Round fruit with medium to coarse skin, green, corky, slightly grainy and easy to peel. Medium to large size fruit (270-680 grams). The seed is medium to large with a flesh ratio of 71-72%.  Rich, nutty flavor, flesh does not blacken after cutting. It is a very productive variety.

Aguacate zutano

Zutano


Fruit ovate to pyriform thin-skinned, light green, smooth, shiny and leathery. Medium size fruit (200-400 grams). The seed is medium to large with flesh ratio around 65%. Low to mediocre quality, watery texture and poor taste. In California it is widespread as a pollinator of Hass and in Spain it has also been used as windbreaks.

Tuesday, March 31, 2015

How to Grow Tomatoes

Planting
If you're planting seeds (versus purchasing transplants), you'll want to start your seeds indoors 6 to 8 weeks before the average last spring frost date.
Select a site with full sun and well-drained soil. For northern regions, is is VERY important that your site receives at least 6 hours of sun. For souther regions, light afternoon shade will help tomatoes survive and thrive.
Two weeks before transplanting seedlings outdoors, till soil to about 1 foot and mix in aged manure, compost, or fertilizer.
Harden off transplants for a week before moving outdoors.
Transplant after last spring frost when the soil is warm. See our Best Planting Dates for Transplants for your region.
Establish stakes or cages in the soil at the time of planting. Staking keeps developing fruit off the ground, while caging let’s the plant hold itself upright. Some sort of support system is recommended, but sprawling can also produce fine crops if you have the space, and if the weather cooperates.
Plant seedlings two feet apart.
Pinch off a few of the lower branches on transplants, and plant the root ball deep enough so that the remaining lowest leaves are just above the surface of the soil.
Water well to reduce shock to the roots.

Care
Water generously for the first few days.
Water well throughout growing season, about 2 inches per week during the summer. Keep watering consistent!
Mulch five weeks after transplanting to retain moisture.
To help tomatoes through periods of drought, find some flat rocks and place one next to each plant. The rocks pull up water from under the ground and keep it from evaporating into the atmosphere.
Fertilize two weeks prior to first picking and again two weeks after first picking.
If using stakes, prune plants by pinching off suckers so that only a couple stems are growing per stake.
Practice crop rotation from year to year to prevent diseases that may have over wintered.

Harvest/Storage
Leave your tomatoes on the vine as long as possible. If any fall off before they appear ripe, place them in a paper bag with the stem up and store them in a cool, dark place.
Never place tomatoes on a sunny windowsill to ripen; they may rot before they are ripe!
The perfect tomato for picking will be firm and very red in color, regardless of size, with perhaps some yellow remaining around the stem. A ripe tomato will be only slightly soft.
If your tomato plant still has fruit when the first hard frost threatens, pull up the entire plant and hang it upside down in the basement or garage. Pick tomatoes as they redden.
Never refrigerate fresh tomatoes. Doing so spoils the flavor and texture that make up that garden tomato taste.
To freeze, core fresh unblemished tomatoes and place them whole in freezer bags or containers. Seal, label, and freeze. The skins will slip off when they defrost.

Tuesday, March 10, 2015

How to grow parisian carrots

Mini round carrots, or Parisian carrots, produce small round roots that aren't much larger than a small radish. These specialty carrots are especially well-suited for container gardens or growing in shallow, rocky beds where larger carrots can't develop straight roots. Mini carrots require the same planting and care as more traditional varieties. They thrive in moist soil in locations that receive six or more hours of sunlight. Plant carrots in spring or fall when soil temperatures will remain above 40 degrees Fahrenheit during the growing season.

1. Sprinkle 1 cup of 16-16-8 blend fertilizer over every 50 square feet of bed. Spread 1 inch of compost on top of the fertilizer. Till the compost and fertilizer into the top 8 inches of soil. Remove any rocks or roots from the topsoil as you till so they don't inhibit the carrot root formation.

2. Water the prepared soil until it's evenly moist to a 6-inch depth. Sprinkle the carrot seeds on top of the soil in rows set 12 to 18 inches apart, sowing about two seeds per 1 inch of row. Cover the seeds with a 1/4-inch layer of soil.

3. Mist the soil daily with a fine spray of water so the soil surface doesn't dry before the seeds germinate. Carrots take one to three weeks to germinate.

4. Thin the carrot seedlings once the plants grow 2 to 4 inches tall. Pluck out the excess seedlings so the remaining carrots are spaced 2 to 3 inches apart in the row.

5. Cover the soil with 1 inch of straw mulch after thinning to help retain moisture, prevent weeds, and to protect the top of the developing carrots from sun exposure. Pull any weeds that grow in the bed promptly so they don't inhibit root formation.

6. Water the carrots once or twice weekly. Supply about 1 inch of water at each irrigation so the top 6 inches of soil remains moist. Don't allow the soil to dry completely between watering.

7. Brush the soil back from the top of the mini round carrots about 60 days after germination to determine their maturity. Harvest the carrots when the top of the roots develop a full orange or orange-red color, depending on the variety, and the carrots measure 2 to 3 inches in diameter.

Tuesday, February 17, 2015

How to Start Seeds

Starting plants from seed is a must-have skill for the small farmer. Whether you're seeding in a high tunnel or on a seed-starting shelf in your farmhouse, these basic steps are the same. Starting seeds indoors will give you more control over the varieties you want to grow and allow you to time everything perfectly. If you're growing on more than a home level, buying starts gets way too pricey. Plus, starting seeds is easy once you know how to do it.

Gather Your Equipment

You'll need a few things to start seeds indoors or in a greenhouse. Have everything set up ahead of time to make seed starting easy.

Containers. You can purchase plastic flats that can be reused year after year, although they should be cleaned in a diluted bleach solution. You can also reuse containers like egg cartons, yogurt cups, or small plastic pots. If you are using plastic cells within the flats, use smaller cells for smaller seeds/plants and larger cells for larger, fast-growing plants.

Potting mix. Seeds are ideally started in a soilless mix or a compost-based potting mix. Get something designed for seed starting.

Seeds. Not all seeds need to be started indoors or in the greenhouse. Some can be direct sowed in the soil outdoors. Generally, you'll start squash, tomatoes, peppers, and melons indoors. Herbs and flowers also can do well with being started and transplanted. Follow the guidelines for each variety.

Labels. You will definitely want to label everything clearly.

Light source and shelving. If not in a greenhouse or high tunnel, you will need to start seeds on a table or shelf with fluorescent lighting to help your plants grow. Plants need about 14 hours of direct sunlight to grow properly.

Prepare Potting Mix

Put your potting mix into a large container, and loosen it with your hands or a spade. Use water to dampen the mix while loosening. It should be moist but not soggy and there should be no dry lumps. When you pick up a handful, it should stick together fairly well, but slowly break apart.

Fill Planting Container

Fill your planting tray and cells with the mix. Pack soil in gently to reduce the air space, but not too dense. Fill to just below the lip of the tray, so water sinks down into the mix instead of flowing over the top.

Plant the Seeds

1. Make indentations in the soil for your seeds. As a general guideline, plant seeds roughly twice as deep as the diameter of the seed (or follow seed packet information). Put one to two seeds in each hole. You can always thin the weaker seedling later by pinching or snipping it at the base of the stem.

2. Cover the seeds with additional potting soil. Again, don't let soil get too close to lip of tray.

3. Water the seeds in gently, sprinkling carefully.

4. Cover each tray with a propagation dome (a clear plastic cover that usually comes with propagation trays). The propagation dome helps to hold in moisture. Remove the propagation dome once seedlings emerge. If you don't have one, drape clear plastic over whatever containers you are using.

5. Label your seedlings carefully!

Care for Your Seedlings

Keep the fluorescent lights on at least 14 hours a day.
Keep your plants warm and free of drafts. The air temperature should be between 65 and 75 degrees F. Plants like peppers and tomatoes like a little more heat, so you can use a heat mat under the tray to keep them warmer. This will also dry them out faster; water more frequently.
Moisten with a mister or sprayer as needed so the seeds don't dry out. "Moist but not wet" is the level of moisture you're looking for.
When seedlings emerge, remove the propagation dome or plastic and make sure to get them under lights.

Potting Up and Hardening Off

Once the true leaves have emerged, your seedlings can remain in their original containers, but if you know it will be a while before the garden is ready for them and they're beginning to get big, you can "pot up" your plants by moving them into a larger pot. Seedlings should be a couple of inches tall and have several sets of true leaves before potting up into three- to four-inch pots.

Once temperatures are warm enough, your hardy, healthy young plants are ready for the cooler temperatures, direct sunlight, wind and other elements of the outdoors - but first you must harden them off. The hardening off process takes three to five days. You can put them on the porch or in another shady spot for three to four hours the first day. Make sure they are protected from the wind and bring them in if temperatures dip. You can increase the number of hours and amount of sun each day. After transplanting during a cooler, shady part of an overcast or gently sunny day, water them well.

Monday, January 26, 2015

How to Choose Turkey Breeds

There are not nearly as many turkey breeds as there are chicken breeds, but there are still enough varieties of turkeys to warrant a decision about which breed or breeds of turkey you will raise as a small farmer or homesteader.


These are the "modern" turkey breed that are raised in factory farm settings across the United States. They maximize the conversion of feed to white breast meat in the shortest possible time. But this efficiency is not without problems. Broad-Breasted Whites can't walk or fly, are prone to disease, and can't reproduce without artificial insemination. They don't taste too great, either.


So, you might be thinking, "What about a heritage breed?" If you want to go the more natural route, which most small farmers and homesteaders do, steer clear of the Broad-Breasted Whites. There are quite a few heritage turkey breeds to choose from. These are the most popular and common of the thirteen recognized heritage turkey breeds.


Bourbon Red turkeys are noted for - yes, you guessed it - their beautiful red plumage. The "Bourbon" comes from their origin in Bourbon County, Kentucky, where they were first bred in the 1800s. They're also known for a delicious, full flavor and are considered one of the best-tasting heritage turkey breeds. Bourbon toms can get to 23 pounds and hens can reach 12 pounds.


Originally from Rhode Island (as you might surmise from the name), Narragansetts were the staple of the New England turkey scene before factory-farmed turkeys became the norm. Typical sizes are 18 pounds for hens and 30 pounds for toms.


Midget Whites are a relatively new heritage breed developed in the 1960s by researchers at the University of Massachusetts. They are a cross of Royal Palm and Broad-Breasted Whites. Although small, Midget Whites are known for their deep, delicious flavor. Toms weigh 16 to 20 pounds and hens weigh 8 to 12 pounds.

Midget Whites are calm and do well raising poults. Because the hens are small, they can become good fence-jumpers.


Developed in the 1930s, these birds are roughly the same size as the Midget Whites, but with wider breasts. They make a nice table bird but are blander than Midgets or some other heritage birds. However, they are prolific layers. Mature hens can be good sitters and hatch eggs well. They're not very social compared to other heritage breeds.


White Hollands were, yes, originally bred in Holland. They migrated with early settlers to the colonies and were a popular meat bird in the United States in the 1800s. Toms can weigh up to 30 pounds and hens, up to 20 pounds. They are calm, good setters and mothers, but sometimes break eggs because the hens are so heavy.


One of the largest breeds of heritage turkeys, Bronzes have also been the most popular turkey variety in American history. Bronzes were originally a cross between the turkeys brought to the colonies by Europeans and the native wild turkeys they discovered in America.

The Broad-Breasted Bronze is a variation that is more commercial and most have been bred by artificial insemination since the 1960s. However, the Broad-Breasted Bronze was replaced by the Broad-Breasted White at that time because white feathers led to a cleaner-looking, more commercially acceptable turkey.

Toms can reach 25 pounds and hens can reach 16 pounds, although birds available today may be smaller than this.


Sometimes called Black Spanish or Norfolk Black turkeys, this breed was domesticated from Mexican wild turkeys brought back to Europe by the first Spanish explorers who visited the New World (America). Their plumage is, obviously, black, and they have been around since the 1500s.


Royal Palm turkeys were bred for their good looks: black and white plumage was all the rage, I suppose? (No, seriously, these are beautiful, striking birds.) In any case, these birds are small and don't have the commercial potential of most other heritage varieties, being mostly raised for exhibition. Still, they are suitable for home production of meat, and are active turkeys that forage extensively. They are also good flyers and control insects well. Standard weights are 16 pounds for toms and 10 pounds for hens.

Tuesday, January 6, 2015

Supplies You Need for Keeping Chickens

Chickens don't need many supplies to keep them happy and healthy. Chickens and other poultry are often one of the first farm animals for beginning farmers. They're easy to care for and don't require a lot of specialized attention. With these supplies, you'll have happy, healthy laying hens or meat birds. Find them at your local feed store or online.


Waterer and feeder. Check out hanging waterers and feeders; these prevent the birds from roosting on them and keep the contents free of shavings and poop. You'll need 4 hanging feeders or 300" of trough space per 100 birds. For waterers, aim for 96" of trough per 100 birds. For large numbers of birds, look into an automatic waterer system.

Feed. Feed stores sell different feeds for the various stages in chickens' lives. There will be a "chick starter," fed for varying amounts of time depending on the feed manufacturer. There is a higher-protein layer feed for laying hens. For birds raised solely for meat consumption, a "grower/broiler" and sometimes "finisher" feed is used. Organic and conventional feeds are available. You can also make your own chicken feed.

Scratch. Scratch is a combination of grains such as corn, oats, wheat and rye. There's also plain cracked corn, which chickens love. Scratch is a nice "treat" for your flock -- just scatter some on the ground and they'll scratch through it with their feet and eat it.

Grit. Some feeds have grit included, but if you feed your hens your kitchen scraps (and you should!), or even scratch grains, they'll need grit. Grit is simply small stones that the birds store in their crop to help them break down food. If your birds have access to a gravel driveway or other source of small stones or sand, you don't need to supplement with grit.

Bedding. Pine shavings, straw and hay are all potential bedding choices for your chickens. It's really a matter of personal preference, cost and availability. Some folks feel that straw or hay can encourage insects and lice to breed more than pine shavings

Thursday, November 27, 2014

Cashmere Goats and their Fiber


Cashmere goats can serve a multitude of purposes:
They produce 3-4 ounces of fine, soft fiber a year which can be processed into wool for knitted garments
They are useful for clearing fence lines and undesirable weeds
Their pelts can be used for rugs and seat covers
Their meat is low in cholesterol

Their history:
Cashmere goats originally came from the Himalayas and migrated with Chinese herders to Mongolia, Tibet and Northern provinces of China in the 10th and 12th centuries.  With the development of the Asian empire, cashmere slowly began to enter the trade routes in the West. In the 13th century Marco Polo brought cashmere to Italy where it became the fiber of choice among the aristocratic elite.

Processing the fiber:
Our cashmere goats have a fine, downy undercoat which protects them from the cold winters, Each spring the fleeces are removed by either combing or shearing. A typical adult goat produces 3-4 oz. of pure down, enough for about 1/3 of a sweater.  The finest cashmere is harvested when the goat is 2-4 years old and after the age of five, the goat’s value is based on its ability to produce offspring.  Once the cashmere is combed off or sheared, the dirt, grass and other non-fiber contaminants must be removed.  The fiber is then sorted by fineness and length.  Coarse hairs are removed leaving behind the medium and long fine hairs.  The shortest cashmere hairs are extremely soft, but because they are so short they will pill if they are woven into clothing.  The fleece is then sorted by color which can be white, off white, tan, brown or grey.   The fleece is then washed, dried and spun into skeins of yarn or left as raw roving.  It takes approximately a year’s worth of wool from three to four goats in order to make a woman’s single ply cashmere sweater. Cashmere is eight times warmer than sheep’s wool and 33% lighter. Cashmere fiber has a crimp or curl that sheep’s wool does not have.  This extra crimp holds pockets of warm air close to the body.  It is the softest animal fiber readily available on the market measureable by its low micron count.  The micron count is the measure of the diameter of the fiber and the lower the number, the softer the fiber.  The finest cashmere has a micron count of 16 or less.

Un-dyed cashmere ranges in color from a snowy white to a chocolate brown with variations of brownish-grey.  White is the most valuable because it can readily accept dye.  However, the more dye that is used, the coarser it feels.  The naturally darker cashmere fibers will be dyed when trying to achieve a black, dark navy, charcoal or brown.  The natural white cashmere fibers will be bleached white and dyed into pastel colors.

Most cashmere sweaters have a label that says Dry Clean Only, but this is to remove liability should you incorrectly wash your cashmere and ruin it.  The quality of a cashmere item can actually improve if you wash it properly in cold water by hand or machine and dry without any heat. It is more expensive to hand knit a cashmere sweater than to buy one because the hand knitting yarn is much thicker than commercial yarn.  The cashmere sweater you buy in a store uses a much thinner commercial yarn which cannot be hand knit. The world produces 9,000-10,000 tons of cashmere each year.

50-60% comes from China (including Tibet and Inner Mongolia)
20-30% comes from Mongolia
10-20% comes from Iran and Afghanistan

Friday, November 14, 2014

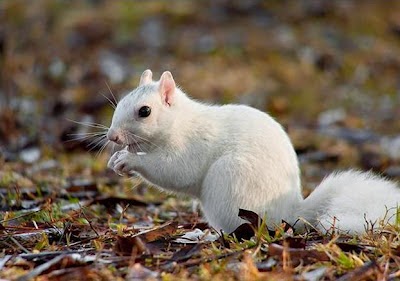
Albino Squirrel

Only 10 in every one million squirrels are born with albinism, and have a very short life expectancy because they are easily seen by both predators and prey due to their obvious lack of camouflage.

What we normally think of when we think of squirrels are tree dwelling gray or reddish mammals. Rarely do we imagine their cousins, the ground squirrels (Prairie dogs) or marmots, even though they are in the same family. Nor do we think of squirrels as white! But, there are many places  that have white or albino squirrel populations.

Most squirrels are gray or red, an adaptation that allows them to blend in to the surrounding vegetation. Tree trunks are usually a dark color and the mottled gray color of the common forest squirrels. However, several towns across america have claimed to have a large population of white squirrels. How could this be if it is advantageous to blend in with the tree trunks to hide from predators?

This is a case of classic natural selection, the driving force behind evolutionary change. Evolution by definition is the changing of the genetic makeup of a population over time. The trait for being white is a genetic anomalie that is usually weeded out because they are so quickly seen by predators. But today we have a different predator: humans.

Many towns have proclaimed to be the "Home of the White Squirrels," and as a result have started trapping and removing their darker brothers and sisters. What a great example of natural selection that has quickly created a dominant squirrel population that is white.

However, there are other places around the country where white squirrels are popping up and it may not be a result of humans trapping the squirrels. Many places have white stone and white buildings of which white squirrels would be highly adapted too. This small advantage may allow white squirrel populations to spread.

Friday, October 24, 2014

Help Honey Bees Survive This Winter

Honeybees are far and away the most important pollinator in today’s agricultural landscape. They pollinate more than 400 crops worldwide, help to create about a third of the food we eat, and contribute an estimated $12 billion to our nation’s food supply.
 All summer long, worker bees can be seen buzzing between flowers, collecting pollen and nectar and, in the process, pollinating vast tracts of crops (upon which we depend) and producing an abundance of honey (some of which is ferried away by beekeepers to local markets for us to enjoy). As summer draws to a close and the weather starts to cool, one of the questions I get a lot is, “What happens to bees in the winter?”

 People often guess that honeybees hibernate; others presume that colonies die as cold weather approaches. Fall’s first frost does kill most members of bumblebee and yellow jacket colonies, leaving lonesome queens to establish new nests each spring.

But honeybees are different.
They’ve evolved a strategy for winter survival that is unique, one that relies heavily on frenzied visitation to flowers throughout the summer and a Herculean group effort in the months beyond. Believe it or not, their success in this endeavor depends on choices that you make for your yard and garden.
Honeybees need their calorie-rich, carbohydrate-loaded honey to keep them alive during the winter; it’s the perfect furnace oil for colonies. Worker bees eat this liquid gold and use the energy it provides to fuel rapid contraction of their wing muscles. Pumping these muscles without flying produces heat in the same way that shivering helps us to warm our own bodies.

As temperatures drop, honeybees cluster together within their hive to share the warmth that their honeybees to keep the inside of their home virtually tropical while the rest of the natural world remains frozen beyond the hive’s walls.
“shivering” generates (picture a ball of bees a foot in diameter and sliced through by sheets of honeycomb). At the core of this cluster, worker bees keep themselves and their queen at a temperature that is only a few degrees lower than that of a healthy human. The cluster’s outer layer consists of tightly packed, slightly cooler workers that insulate the core as effectively as bird feathers or mammalian fur—don’t worry, everyone gets to rotate. This remarkable group behavior allows
Here’s where we come in. Honeybees in temperate climates have only a limited window—about 60 days in total—to stockpile the food reserves that they will live off for the rest of the year. This means that we need to do everything we can to create an environment that lets bees succeed as pollinators when the going is good. Here are three ways you can help bees survive winter:

• Plant late bloomers. When it comes to enhancing your garden’s fall bloom, consider adding late-flowering plants like goldenrod and asters that are critical to a colony’s final push to bring home food for the winter.

• Avoid systemic pesticides. Certain pesticides have toxins that invade all plant tissues (instead of just living on the plants’ surface), and bees bring these chemicals to their nests when they collect nectar and pollen. A group of chemicals called nitroguanidine/neonicotinoids has been shown to contribute to colony collapse disorder.

• Encourage early-spring blooms. Spring brings welcome relief for honeybees with a chance to restock dwindling floral supplies. Flowering trees—willows, maples, and the like—provide some of the earliest opportunities for bees to forage, so try to encourage their toxin-free growth when you can.

Friday, October 3, 2014

How to Store Apples for Winter

Interested in storing a bushel of apples to enjoy over the cold winter months? Once you learn a few storage tricks, it's easy to do.


1. Start with apples that keep well. Late-ripening varieties (those harvested in October) usually do best. These include: Red Delicious, Ida Red, Winesap, Crispin, Stayman, Rome, Northern Spy and Turley.

2. Inspect all apples for bruises, cuts and soft spots. Only perfect fruit is suitable for storage.

3. Sort the apples by size: small, medium and large. Since large apples don't store as well, this will make it easy to ensure that they get eaten first.

4. Place the sorted apples in perforated plastic bags or in boxes lined with perforated plastic (to allow for air circulation).

5.Store in a cool basement, garage, fruit cellar or refrigerator. The ideal storage temperature is 30-32°F with 90% humidity. Apples are likely to suffer freeze damage if the temperature dips below 30° and will ripen quickly, if the temperature rises above 40°, so do your best to match these conditions.
Check regularly for signs of spoilage, and remove any damaged fruit.


Tips:

1. Pick apples when they are ripe. Over or under-ripened fruit will not store well.

2. Store apples as soon after picking as possible.

3. Avoid storing your apples near onion or potatoes. They'll readily absorb the flavor of other foods.

4. Don't mix apple varieties. Different varieties ripen at different rates.

5. Expect your apples to last up to five months in storage (depending on variety and storage conditions).

Tuesday, September 2, 2014

Tips For Growing Cucumbers

Cucumbers are great for pickling, tossing in salads, or eating straight off the vine.


There are two types of cucumbers: slicing and pickling. Each type comes in several different varieties. The slicing types are long and usually grow to about 6 or 8 inches in length while the pickling types are shorter, reaching around 3 to 4 inches once mature.

There are now many bush or compact varieties of cucumbers available that are ideal for growing in limited space.


Cucumbers can be started indoors in peat pots or small flats and transplanted to the garden a couple weeks thereafter but only when all danger of frost has passed. Before you move them to the garden, however, harden the cucumber plants off in a protected location to lessen any stress that may occur during transplanting. During cool periods, cucumbers can be covered with plant protectors as well.


Cucumbers like warm, humid weather; loose, organic soil; and plenty of sunlight. They grow well in most regions of the United States and do especially well in the South.

When planting cucumbers, choose a site that has adequate drainage and fertile soil. Good soil will have plenty of organic matter, such as compost. Adding compost to the soil will help get your cucumbers off to a good start, and applying an organic fertilizer, such as manure, will help give the plants nutrients during growth. When you begin preparing the soil, remove any rocks, sticks or other debris and then mix ample amounts of organic matter and fertilizer into the soil.

Cucumbers may be planted in hills or rows about 1 inch deep and thinned as needed. Since cucumbers are a vine crop, they usually require a lot of space. In large gardens, cucumber vines may spread throughout rows; within smaller gardens, cucumbers may be trained for climbing on a fence or trellis. Training cucumbers on a fence or trellis will reduce space and lift the fruit off the soil. This method also can provide your garden with a neater appearance. The bush or compact varieties are quite suitable for growing in small spaces or even in containers.

Friday, July 25, 2014

Symptoms of a Sick Goat

In order to be able to recognize when a goat is sick, the owner must closely observe their herd when they are healthy. The average healthy goat is alert and curious. They show interest in food and chew their cud after feeding. Their eyes are bright and clear and their nose is dry. Their coat is shiny and clean and in good weather their tail is up. Their droppings are firm and pelleted and their gait is energetic and steady. They will have a temperature between 101.5 and 103.5, keeping the outside weather conditions in mind.


Through daily observation the goat owner will learn what is normal for the individuals in their herd and will be able to quickly spot a goat that just isn’t acting right, one that may be sick. Early assessment and action greatly increases the chances of a successful outcome to treatment.

Some warning signs of a goat that may be sick or need medical attention are:
A goat that separates itself from the rest of the herd.
Standing with its head and tail down, with a hunched back.
Trembling, muscle twitching or head shaking.
A goat that is anxious or weak, listless or reluctant to move.
Poor appetite, won't eat or won't drink.
Change in consistancy or color of feces, scouring (diarrhea) or tapeworm segments.
Strains to urinate, unable to urinate, or blood in the urine.
Fever (above 103.5) or subnormal temperature. (below 101.5)
Moans or cries.
Grinding teeth, signs of pain.
Bloated, kicking or biting at stomach.
Enlarged knees or recuring abscesses.
Rapid, shallow breathing.
Chronic cough or sweet smell to breath.
Cloudy or green nasal discharge.
Cloudy, watery, closed eyes or a discharge from them.
Dull, scruffy coat, sores, scabs or other skin problems.
Excessive rubbing, scratching or biting at lower legs.
Soft swelling under face (bottlejaw), white gums and inner eyelids.
Abnormal color or consistency of milk.
Hot, lumpy or hard udder.
Limping, tender "walking on eggshells" gait or a bad, distinctive odor to hooves.
Unsteady, drunken like gait, circling or stiff sawhorse like stance.
Unable to stand, lies on side making paddling movements.
Unexplained weight loss.
Although goats are typically hardy animals, they can still be susceptible to parasites, illness and diseases. A preventative disease program should be discussed with your goat knowledgeable veterinarian.

Monday, June 30, 2014

The Importance of Quarantining New Goats

If you’re adding goats to an existing herd, you need to quarantine any new goats you purchase for at least 30 days. This means that you need an area with adequate shelter that completely separates your herd from the new goats. Quarantine protects the other goats from any unknown or undisclosed health problems that the new goats might have.


During the goats’ quarantine time, do the following:

Have them tested for CAEV or any other diseases you want to test for, unless the seller has provided you with documentation that the goat has been tested and had negative results.

Observe the goats for signs of any disease, such as soremouth lesions or abscesses.

Watch how the goats adjust to your feeding and management program.

Do a fecal analysis and deworm if necessary. If you’re unable to do a fecal analysis, routinely deworm all goats in quarantine

One particular symptom you should keep an eye out for is shipping fever. Blood tests show that a goat needs about three hours after being transported to stop having a physical stress response, but the move's effect on the goat's immune system can last longer. This immune response can, at worst, lead to shipping fever.

Shipping fever can cause pneumonia and sometimes diarrhea. Signs to look for include temperature of over 103.5° Fahrenheit, nasal discharge, coughing, rapid breathing, or rattling in the chest. Contact a veterinarian if your new goat has any of these signs.

Thursday, June 12, 2014

How to Control Insects in Your Goats' Living Space

If you're new to raising goats, it may surprise you that flies, mosquitoes, and other bugs are part of raising livestock. But you do have some options for controlling these critters. The cheapest way to minimize pests is to keep the barn or goat shed dry and remove wet bedding weekly during warm or hot weather. Pay special attention to the areas around water buckets, where the flies are more likely to breed.


You can also build a bat house for the outside of the barn or on a nearby tree. Bats eat mosquitoes and other insects, and so having them around is beneficial to a farm. The only disadvantage to having bats is that they carry rabies, which a curious goat can get from inspecting a crazy-acting bat.

To discourage mosquitoes, eliminate standing water where they can breed. If you have water that continues to build up, just pour some vegetable oil on the top to stop the mosquitoes from breeding. Or you can buy a product called Mosquito Free Water from livestock supply companies; it's safe and can be sprayed on standing water.

Some people use insecticides to control flies and other pests, and you can find many of them on the market for just this purpose. But remember: the chemicals are poison and can harm you and your goats. You probably don't want insecticides in your milk or meat. Here are some non-toxic methods for controlling flies:

Fly parasites: You can buy these tiny wasps, which feed on fly larvae, from biological pest control companies and some livestock supply catalogs. You get them in regular shipments through the mail and put them out through the summer near wet areas, where flies are more likely to hatch.

Fly strips: These are inexpensive and amazingly effective. You unwind these sticky strips and hang them with tacks around the barn. When the flies land on them they get stuck. Mr. Sticky is the most effective brand.

Mr. Sticky mini roll: This product is superior to fly strips because the roll lies horizontally rather than vertically, and so flies are more likely to land on it. The mini kit is perfect for a small barn. It is an 81-foot reel that you attach to the walls across a stall and roll up as it fills with flies. You can also buy a 1,000-foot roll.

Fly trap: You can find various fly traps on the market. One is a plastic bell-shaped trap that you fill with stinky bait and hang from the ceiling. Flies are attracted to the smell, crawl in, and then can't get out. These smell bad, so you need to place them where you won't accidentally walk into one.

Citronella fly spray: Citronella spray is made for horses, but you can spray it directly on goats when they are being bothered by deer flies or horse flies that are particularly aggressive.

Wednesday, May 21, 2014

How to Give Your Goat an Injection

You can have a vet visit or take your goats to a clinic to receive vaccinations or other injections, and many goat owners do this. But to save the money, you can do it yourself. Giving injections is easy after you get over any fear you might have.

It can help to have an experienced person demonstrate the technique before you try it. You can also practice by injecting into an orange — just remember to dispose of your practice needles and syringes. You can get needles and syringes at a feed store, veterinary office, or livestock supply catalog.

Anaphylaxis is a severe, sudden allergic reaction. The faster it occurs, the more severe it is. If a goat unexpectedly collapses or goes into shock after an injection, administer epinephrine immediately. The dose is 0.5–1.0 cc per 100 pounds.

The two most common types of injections are subcutaneous (SQ), which is just under the skin, and intramuscular (IM), which goes into the muscle. Read the instructions that come with the medication you're using to determine what type of injection to give. Most injections that can be given IM also can be given SQ; consult with your veterinarian regarding which injections you need to give IM. Giving subcutaneous injections is a bit easier because you don't have to worry about hitting a blood vessel or vein.

When you're ready to give injections yourself, gather your supplies and bring your goat into an area away from the other goats. Have someone hold the goat and find the site where you will give the injection.

Never use the rear leg as an injection site because you can hit a nerve and make your goat lame.


The best places to give injections are the sides of the neck and "armpit" area just behind the front leg.

Gather your supplies:

Medication

Disposable needle and syringe

Alcohol and cotton balls or other wipes

Container for sharps (used needles), which you can purchase at a drug store

Before giving the injection, wipe the top of the medicine vial with alcohol to ensure that it's sterile. Then insert the needle into the bottle and withdraw the required dose of medication. Withdraw the needle and tap the syringe and push the injector slightly to push out any bubbles.

To give an SQ injection:

Lift the skin into a tent.

Insert the needle under the skin into the tent, toward the body.

Make sure that the needle isn't in the skin or muscle, or through the other side of the tent.

Inject the medication and remove the needle.

Discard the needle and syringe into your sharps container.

To give an IM injection:

Insert the needle into the muscle, being careful not to hit bone.

Withdraw the plunger slightly to make sure that you have not hit a vein or vessel.

If you see blood in the syringe, pull out the needle and start over.

Depress the plunger slowly, and then withdraw the needle.

Rub the injection area gently but firmly to distribute the medication.

Discard the needle and syringe into your sharps container.

Never use the same needle or syringe for different medications or on different goats. Mixing medications can make them less effective or cause an unexpected chemical reaction; sharing needles can spread diseases from one goat to another.

Friday, April 25, 2014

5 Incredibly Intelligent Animals


Octopuses are considered the most intelligent of all invertebrates, and are even smarter than most other species on the planet. They have both short and long-term memory, they can navigate mazes and escape from aquariums, and they have even been known to sneak aboard fishing boats, pry open holds and gorge on captured crabs. It’s very tough to keep octopuses as pets due to their problem-solving skills and their ability to squeeze through openings no bigger than their eyeballs.


Humans have been domesticating and training elephants for the last four thousand years. Their intelligence, coupled with their strength, has been put to use in construction, war, and under the big top as entertainment. The extremely sad fact is that if elephant poaching continues at its current rate, African elephants could be extinct in less than fifteen years. 


A member of the highly intelligent bird family known as corvids, crows have often proven themselves just as clever as chimps and gorillas. Not only are their brains about the same size as some primates, but they share many behavioural similarities: using tools to get food, retaining memories, and anticipating future events to help them solve problems.


We are quick to reward the dog when he rolls over on command, yet we’ll cringe at the sight of a pig rolling in filth. But pigs are, in fact, the smarter of the two species. Pigs can be taught the meaning of certain words and phrases, and, after years without hearing them, will still remember what those meanings are. Mothers sing to their young while they’re nursing, pigs learn from the mistakes of other pigs, and they can play videogames too complex for 3-year old children. 


Before Jane Goodall discovered that chimpanzees use sticks to dig and fish out delicious termites, it was believed that only humans wore the tool belt in the animal kingdom. But not only do chimpanzees use tools for food, they can also fashion weapons for hunting.


Chimpanzees live in highly organized hierarchal societies, can appreciate a beautiful sunset, will mourn the death of a loved one, and can not only learn sign language but pass it along to others.

Wednesday, April 2, 2014

10 REASONS WHY YOU SHOULD EAT RABBIT MEAT!

Back in the 1940s and 1950s rabbit meat was as common for dinner as chicken is today. It is the meat they got many people and their children through the lean times of the Depression. They lost their popularity after Big AGRA, who wanted to get maximum profits with the cheapest bottom line using the government endorse chemicals and handouts. Because of this rabbits didn’t make sense. So why even eat rabbit meat now? Below you will find a few reasons why you should consider adding rabbit meat to your diet. Raise some rabbits in your lots, yards, or pastures. Become closer to your food supply know what you eat!


1. It is one of the best white meats available on the market today.

2. The meat has a high percentage of easily digestible protein.

3. It contains the least amount of fat among all the other available meets.

4. Rabbit meat contains less calorie value than other meats.

5. Rabbit meat is almost cholesterol free and therefore heart patient friendly.

6. The sodium content of rabbit meat is comparatively less than other meats.

7. The calcium and phosphorus contents of this meat or more than any other meats.

8. The ratio of me to bone is high meaning there is more edible meat on the carcass than even a chicken.

9. Rabbit meat with the many health benefits does not have a strong flavor and is comparable to chicken but not identical.

10. Rabbits are one of the most productive domestic livestock animal there is. Rabbits can produce 6 pounds of meat on the same feed and water as the cow will produce 1 pound of meat on the same feed and water.

So as you can see there are many health benefits to eating rabbit meat. It is healthy for you and cheap to produce. Why not try to incorporate some rabbit meat into your diet today! Try it you’ll like it! Use rabbit as a replacment for chicken in any chicken recipe.